Camping in our FJ Cruiser
CrtrGrl and I have enjoyed tent camping and backpacking and we want to spend more time outdoors than we currently do. We want to make camping and exploration easier and more comfortable, by spending less time setting up camp and having more time for nature and photography. A base-camp, from which we can do day hikes or backpacking, would provide comfort and ease-of-use. It has to be something we can live in for weeks at a time and that supports our lifestyle.


Overland and Exploration
We considered purchasing a motor-home, travel trailer, some kind of camper van (like a 4×4 Sportsmobile) and even an expedition trailer (like a Turtleback). These were vehicles we might even be able to live out of for extended periods of time. A motor-home would be a larger expense due to buying a whole new vehicle. A travel trailer would be limited in size to what our FJ Cruiser could haul (5000 lbs). Something like a 4×4 Sportsmobile would fill our needs, even though stealth camping isn’t important to us, but would also be very expensive as a whole new vehicle.

While going through the options, CrtrGrl and I realized that we didn’t want to lose the off-road, all terrain benefits of our FJ Cruiser. We really enjoy camping in the wilderness, far away from other people and civilization. So that ruled out a motor-home and a normal travel trailer. An expedition trailer would fit our needs, but would make driving a bit more complex by adding a third axle. Parking, backing up, etc would be more difficult. We haven’t ruled that out for the future, but for now, we don’t want to tow anything. Then we found YouTube videos of folks that have built out their FJs or Jeeps to be overland vehicles. Bingo!
Systems Engineering / Requirements Analysis
We started to put together the features we wanted, and of course like any good engineer, a set of requirements:
- Easy to setup and take down
- More time for adventure and photography.
- Protection from the sun, wind and rain
- The Pacific Northwest (PNW) is our favorite part of the country, so that’s what we want to be prepared for.
- A camp kitchen
- Quick setup and easy access to water, fridge, stove and prep area.
- Plenty of extra gas (learned from Death Valley)
- FJs don’t have large fuel tanks or get the greatest gas mileage. 🙁
- Plenty of extra water
- We want to be able to travel without access to fresh water sources.
- A comfy bed
- A good sleep while camping/traveling can be a challenge.
- Modular – we can remove components when we’re not camping
- Because we use the FJ for other things.
- Shower setup
- If we’re out there long enough, this becomes more important if we want to be near other humans again.
- Storage
- We need compartmentalized storage so we’re not constantly digging for things in the back.
- Off-grid power
- We’ll want something to power a fridge.
- The ability to recharge camera batteries is important.
- Socially/eco responsible products (as much as possible)
- Fair labor, no animal products, renewable materials when possible.
- Durable
- We’d rather pay more up front than have it break down while in use, in the middle of nowhere.
- Hot Tub*
- Because, why not!
- Butler*
- Wouldn’t that be nice.
*Hmm, maybe we’re asking for too much.
Throughout this series, I’m going to try to provide enough information for someone else who is looking to build something similar. We want you to take advantage of the homework we’ve done or learn from the mistakes we’ve made. At the same time, we don’t think you want to read a 50 page blog just on installing a roof rack. We’re more than happy to provide more information, so if there’s something you’re looking for, please leave a comment and we’ll provide the gory details!
Check out the really cool video that CrtrGrl made to share some of the fun we had putting it together:
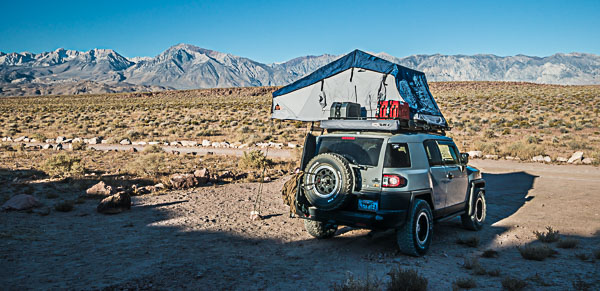
Roof Rack
Step 1 was the roof rack. Could the factory FJ roof rack support everything we might want to mount up top? As it turns out, not really. The factory roof rack primarily covers the back half of the roof and is curved. It’s possible to add cross bars to flatten it out, but that would raise any mounted equipment higher. It’s also possible to add a Baja Basket to the front, but that didn’t meet our needs.

We opted for the Front Runner Slimline II Roof Rack. It checked all the boxes for being sturdy and modular. It’s low to the roof and it’s possible to mix and match components to build exactly what we wanted. Many roof rack manufacturers, including Front Runner, have racks that are designed to fit in the stock mount points for FJ Cruisers.
I’m Still Learning How to be a Responsible Consumer
Later, CrtrGrl asked if I did my research on fair trade, manufacturing and sustainability for each product purchased. Oops. I was so focused on features and getting the best deal, I neglected to do my homework on each vendor and their practices. We’re now taking a hard look at each one and will share what we’ve found.
For some products, there may not be great alternatives. For any that don’t practice fair labor or have a negative impact on the environment, we’re going to donate to a suitable charity, in an attempt to offset the impact of our consumerism. We’re not doing this to make our truck look cool or show off our gear and we don’t want to support companies that are causing harm.
Taking Apart our FJ
Emboldened by installing a factory tow hitch for the FJ with my dad, we decided to do the roof rack installation ourselves. Since my parents have all the tools, we had everything shipped to their house. It was also a great opportunity to work on another project with my dad. He’s always been a handyman, but growing up, I didn’t learn the skills from him. This was a chance to work side-by-side with him on a project.
Taking off the factory roof rack was actually really easy. Just 12 bolts needed to be removed and it lifted right off.


The last thing we worked on that day was putting together the actual roof rack. I ordered the 8″ extended rack so that it would go all the way to the front of the roof. We also got the short expedition rails for the back 1/4 of the rack. There were some challenges getting the corners to fit in properly. At first, we thought it was because the rectangular rack wasn’t square in the corners, but even with a rubber mallet, we still weren’t able to get the holes to line up.
Over the next week, my dad ground down one of the corner pieces and that allowed them to fit together.


Next Steps
This was just the first step. Join us on the next step in our journey transforming our FJ Cruiser into an overland adventure vehicle!